
How To Start A Blog In 2025 + Step-By-Step Tutorial
This article will teach you how to start a blog in 2023 with only the most basic computer skills Step-By-Step. It will help you create a beautiful blog ready for sharing with the world.
This guide was created for beginners. This guide will take you through every step with lots of photos and videos. It can be overwhelming to start a blog. This guide will help you get started with blogging. You can start your blog in 30 minutes, regardless of whether you are 9 or 90!
Step 1: sign up for a blog hosting company

Signing up for a blog hosting company is the first step to getting your blog online. There are numerous providers available, so it’s essential that you select one that meets all of your requirements.
Blogs are websites that feature discrete, informal diary-style text entries posted regularly. It’s an effective way to communicate information with your readers, build a reputation as an authority in your field, and make money online.
The key to creating a successful blog is creating content that’s interesting and captivating for your readers, while using SEO best practices to help search engines locate it. A reliable blog hosting provider should help optimize your blog so it ranks higher in results when searched for.
You’ll also require a domain name and blog hosting plan with enough space for your site’s content. The amount of space provided depends on the plan you select, so be sure to read all details before signing up.
Your blog requires a significant amount of resources, so it is essential to select a plan that meets both your requirements and budget. Some shared hosting packages offer unlimited storage while others limit the bandwidth your site can utilize.
Speed is essential in 2023 blogging, so make sure your pages load quickly on a host. Slower load times may turn off visitors and cause them to go elsewhere, so ensure your host meets these requirements. (I can attest! i hate it when pages take forever to load)
Security should also be taken into account, so make sure your hosting plan includes a free SSL certificate which will display a padlock

in the domain address bar to let people know their information is encrypted for added protection. (if you don’t see a padlock check for an HHTTPS message. if it says HTTP then you are missing an SSL certificate and many people will click off your site for fear of a virus)

Hosting companies often provide a range of features and services, such as domain registration, site building, email accounts, and more. Some even provide free blog platforms, making setting up your new blog much simpler than switching platforms later.
Your blog platform choice is crucial for its success, so make sure to select wisely. Hosted platforms often have limited templates and features, so make sure the platform fits best into your business requirements.
Blog hosting services should offer expert support when needed, whether that be through email, phone, or live chat.
You should select a host that provides 24/7 customer support so you don’t have to fret about tech problems while building your site. The last thing you want is for it to go down due to an issue, so having knowledgeable support staff who understand WordPress will enable them to fix problems promptly and efficiently.
Costs should be clear and understandable, with either a monthly payment option or an upfront payment required. It’s also essential to determine whether a hosting company provides either monthly payments or an upfront fee.
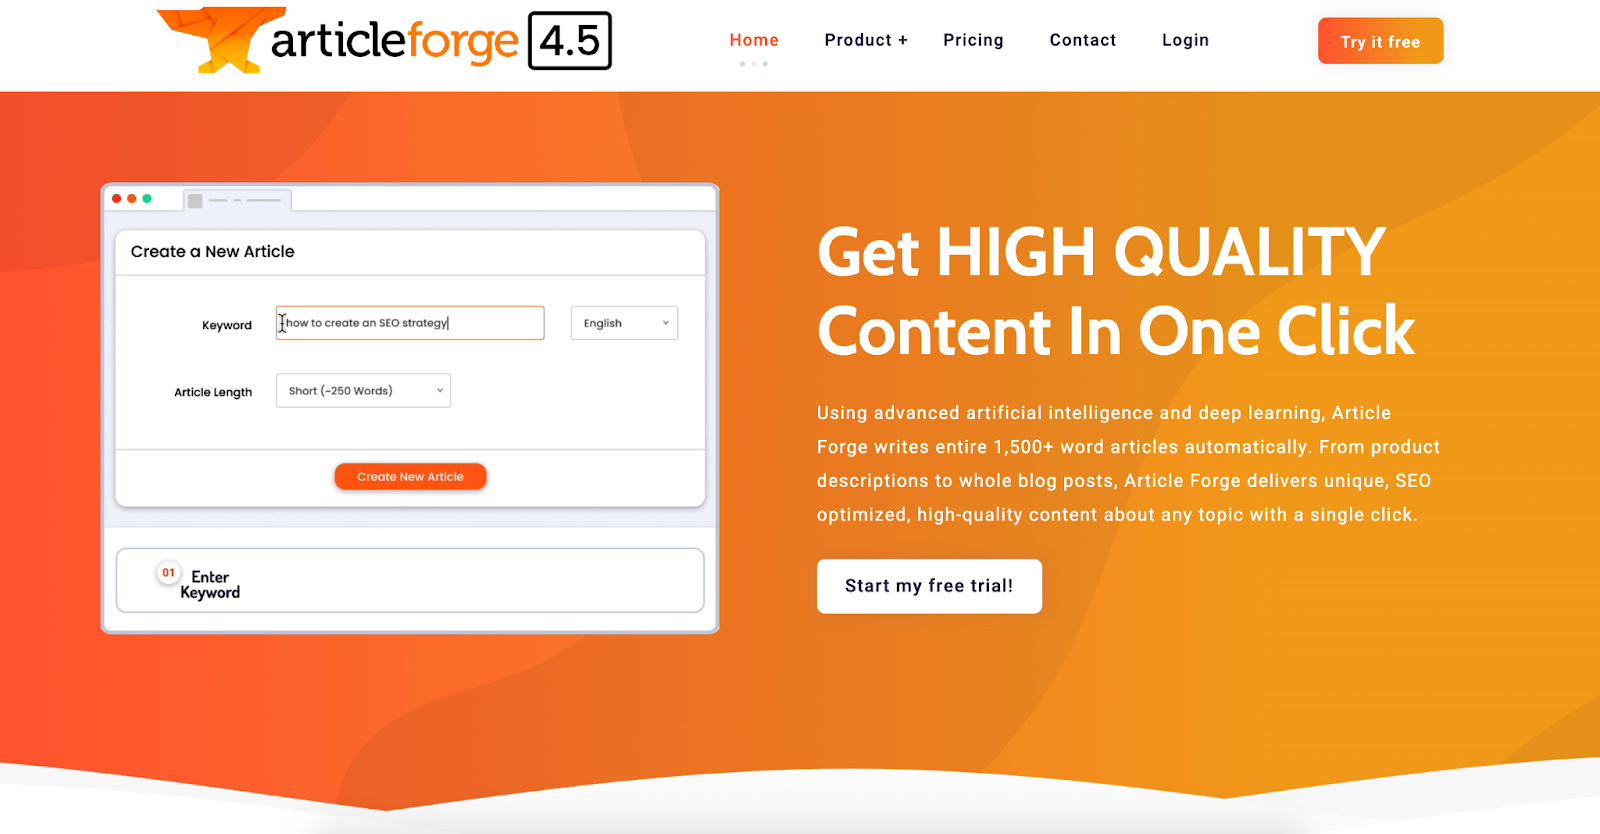
If you’re just starting out, a plan with a low up-front price and monthly payment option may be ideal for you. This will allow you to get started on a budget, and as your traffic grows higher, you can upgrade to a higher plan. Today We will be using groove-blog To Create an Article.
How To Start A Blog Step 2: Sign Up For An AI Writing Tool
In today’s fast-paced world, ai writing tools are becoming more and more popular. Not only can they assist with ideation, vocabulary, structure, and error removal — but they also improve tone and quality of your content.
However, AI writing tools come with some drawbacks. For instance, it can be challenging to train them on your brand’s voice and tone.
Writing by hand
Writing by hand has long been known to have cognitive benefits, including helping students learn. Recent studies reveal that the act of writing activates areas in the brain which improve comprehension and memory while also relieving stress levels.
Handwriting is such an essential skill in most classrooms that it’s considered a core competency. Yet with today’s fast-paced curriculum, some educators and parents may question if handwriting instruction still makes sense.
Handwriting not only encourages children and adults to pay attention, think more deeply, and form connections between their thoughts; but studies have even demonstrated that it can increase their creativity.
Another reason writing by hand is so beneficial is it allows someone to connect with their inner voice and express themselves without being constrained by technology. Furthermore, it helps writers come up with unique solutions for difficult problems, which in turn fosters creativity.
Writing by hand, whether with pen and paper or an app, encourages you to slow down and consider each phrase more carefully. Furthermore, it provides a tangible record of your progress as well as any edits made along the way.
If you’re a busy person, then finding time for writing can be challenging. Finding words to express yourself can be a struggle and when they won’t come naturally, it can be hard to figure out why.
In addition to increasing your confidence and empowerment, handwriting also makes you a better communicator. People tend to remember a handwritten note or letter more readily than an email, as it’s much more personalized.
According to Daniel Oppenheimer of the University of California, handwritten notes helped students retain information more easily and stimulated areas in the brain associated with recall and comprehension.
Are you searching for a fast way to create thousands of words in minutes? Consider investing in an AI writing tool. This type of software can help solve writer’s block, produce unique and pertinent content across more than 25 languages, and even adapt content specifically for certain audiences. The key is selecting the right AI writing software that understands your brand’s goals, needs, and customer profiles.
But come on really. if you write by hand you WILL NOT SUCCEED. let’s look at the article forge for an example. the average person takes 37.5 minutes to type 1500 words. article forge takes 1-3 minutes that means article forge is 18+ times faster because not only does it write but it also proofreads, researches, and more. so let’s say all of your competitors use article forge to generate a 20,000-word article in just 26 minutes and you take 8 hours. you will never outrank them unless you put weeks of research and effort into an article!
Generating thousands of words in minutes
AI writing tools utilize artificial intelligence and machine learning to generate text from user input. They are capable of creating marketing copy, landing pages, blog topic ideas, slogans, brand names and lyrics with precision.
They can also create SEO-friendly content that attracts Google and other search engines. However, it’s essential to note that these tools aren’t as creative as human writers and require training in order to function optimally.
To guarantee your content is as creative and accurate as possible, it’s wise to train your AI with your company’s brand guidelines and tone of voice. Doing this will enable the tool to create original, authentic material that aligns with your company’s voice.
Many of the best AI writing tools utilize GPT-3, an openAI language model that utilizes deep learning to generate human-like content. It’s one of the most advanced models in the industry and capable of creating everything from blog posts to ebooks.
GPT-3’s accuracy makes it the perfect choice for brands looking to expand into new markets, as it produces content in 25 languages. This versatility makes GPT-3 an ideal option for businesses that don’t want to be bound by language limitations.
GPT-3 is also highly efficient at producing social media posts and email newsletters. The technology enables it to generate unique content that will stand out from competitors.
Another way to enhance your written content is by using a paraphrasing tool like Quill Bot. It can help rewrite sentences, paragraphs or entire articles and gives style suggestions that will improve the words you use.
Quill Bot is free and boasts a number of useful features that will make writing easier. These include grammar checking, style suggestions, and an thesaurus to help you locate the ideal word to use in your piece.
GPT-3 can be an invaluable asset to those who must create large amounts of written content quickly. It’s especially helpful for those experiencing writer’s block or needing an expeditious way to generate ideas.
Avoiding writer’s block
Writer’s block is a common issue faced by writers. Not only can it be discouraging and make writing seem like an endless task, but it can also negatively affect the quality of your work. Fortunately, there are ways to avoid this frustrating problem and make writing simpler.
One way to combat writer’s block is by using creative writing prompts or exercises. These can help get the creative juices flowing again and prevent burnout. Another alternative is signing up for an AI writing tool that helps create content on a large scale.
Some AI writing tools can even generate unique content based on specific keywords and topics. This can be an excellent way to boost your blog posts’ SEO and save time at the same time.
This tool is ideal for businesses that need to generate a lot of content on a regular basis. It also has the capacity to create social media posts, product descriptions, ads and more with ease.
This process is straightforward and can be highly efficient, particularly if you don’t have much time to create content on your own. That’s because these tools will generate ideas based on keywords or topics that have already been considered.
Aside from increasing your blog’s SEO, AI writing tools can also enhance the quality of your content. They assist in crafting better articles, rephrasing them, and checking for errors.
You could also break the writing process into segments. For instance, set a timer for 25 minutes and write until it goes off; then take a five-minute break before starting again with the timer.
There are plenty of other ways to stimulate creativity, so give some of them a shot and see which works best for you! Additionally, using a distraction-free writing program can keep you focused on your work.
Jasper is a tool that integrates GrowthBar and Copy AI functionality in one package. It can assist with short-form content such as product descriptions, blog post ideas, Google Ads, and LinkedIn Ads. Plus it comes with its own Chrome extension so you can write content while on the go!
Avoiding plagiarism
Business owners will find an AI writing tool useful in saving them time and money by creating original content that is optimized for search engine optimization (SEO). Not only that, but it helps create a consistent writing style as well as improve content quality – an effective way to boost your business’ online presence and draw in more customers.
When selecting an AI writing tool for your company, there are plenty of options to choose from. Popular options include ProWritingAid, Hemingway Editor and Grammarly. These programs can help identify mistakes in your work and offer suggestions for improvement. Plus they boast a vast data set which means they can even craft paragraphs based on what you input!
These tools can also assist in avoiding plagiarism by scanning your work and detecting copied material. Furthermore, they suggest synonyms and paraphrasing that make it simpler for you to create unique content without plagiarizing someone else’s work.
Another advantage of AI writing tools is their rapid production of high-quality content. Some even automate entire blog posts or articles for you.
These AI tools can also be utilized for grammar checks and punctuation corrections, as well as producing SEO-rich content. Some even come equipped with built-in plagiarism detectors that detect and report on copied material.
To prevent plagiarism, take notes when studying a topic. Doing this will guarantee that you use proper citations and reference materials for your article or paper.
For instance, when researching an event, write down the dates, locations and details so you can use these in your article or paper. Doing this helps avoid plagiarism and allows for the incorporation of your own research into the piece.
It’s essential to remember that plagiarism is a grave matter and can have severe repercussions for both your brand’s reputation and its search engine rankings. Therefore, taking immediate steps to eliminate plagiarism from your system is vital.
Step 3: writing your first blog post

As a beginner blogger, writing your first blog post may seem intimidating. However, the process is fairly straightforward if you adhere to some fundamental guidelines.
Begin by selecting a topic you are passionate about and hasn’t been covered by other bloggers yet. Doing this will increase the visibility of your post in search engine results.
Choose a Topic
Making a topic choice for your first blog post is essential as it sets the tone for what comes after. Make sure it’s pertinent to both your niche and audience, providing value to readers.
When selecting a topic for your content, the initial step is conducting keyword research. This will enable you to identify what people are searching for online and how best to reach them with your material.
Once you’ve done this, you can start creating a list of possible topics. While this can be challenging, there are resources available to help brainstorm ideas. Impact, for instance, has a blog title generator which takes in some nouns and generates various headlines to get you started.
HubSpot’s blog topic generator is another useful resource that offers plenty of topics to choose from. This tool is especially beneficial for new bloggers since it enables you to see what other people are writing about within your niche.
Selecting a topic can be overwhelming, but it is essential to find one that resonates with you. Doing this helps avoid writing on topics which are too general or uninteresting, which could result in wasted time and money when blogging.
It’s essential to consider the format of your post. While it can be tempting to write long-form pieces, keep them concise and to the point. Doing this allows readers to quickly scan through them and grasp what the article is about.
The next step in blogging is writing the actual post. This can be one of the most difficult parts, and it’s easy to become overwhelmed. But it’s essential that you stay motivated and finish writing your first blog post as quickly as possible.
Your post should be tailored towards your audience, not just search engine optimization (SEO). It should answer a specific question they have and address their pain points.
Establishing yourself as an authority in your field is the ideal way to win over readers’ trust and encourage them to read more from you in the future. This will encourage them to come back for more content from you in the future.
Conduct Keyword Research
If you want your first blog post to be successful, research the topic thoroughly. This will enable you to determine the appropriate keywords to incorporate into the text and figure out which terms generate the most traffic.
Start by using a keyword research tool to uncover keywords relevant to the topic of your blog. For instance, if you’re an engineer, an appropriate top-level topic might be “plumbing.”
Once you have a list of potential keywords, run them through a tool to see if there are any that have lower search volume. Doing this is essential since some keywords have clear intent but low search volume, making it difficult for you to rank well.
Next, you should analyze your competition and discover which keywords they use. Doing this gives an indication of how many people are searching for these terms and if they’re highly competitive.
Additionally, you should utilize Google Trends to discover which topics and keywords are popular with your audience. Doing so will enable you to craft content that relates to these hot topics and can boost your SEO rankings in the process.
Another way to identify keywords for blog posts is by conducting a survey and asking your target audience what they expect in an article. Doing this gives you insight into the problems your readers are trying to solve.
Finally, prioritize your keyword research and decide which ones to invest in first. This is a highly personal decision, but it’s essential for maximizing the return from your efforts.
It’s wise to continue your keyword research regularly, as trends and niche markets can shift quickly. With consistent efforts and the application of your keywords correctly, you will reap the rewards of your efforts. Additionally, re-evaluate your keywords periodically in order to make sure you’re still finding new opportunities for success.
Create an Outline
A detailed outline for your blog post can make it simpler to organize ideas and craft an effective piece. Furthermore, it guarantees that all pertinent details have been included.
Outlining can be done in many ways, but the most popular type is an outline with bullet points and numbered lists. This format is often found in textbooks or reference guides and allows you to organize your content quickly and efficiently.
When creating an outline for your blog, it’s essential to take into account your audience and their interests. This will enable you to select topics that resonate with readers as well as include keywords that will boost its SEO value.
Additionally, you should incorporate any pertinent studies or data into your blog post for added credibility and depth. Doing this will make your post stand out from others on the same topic and boost its search engine optimization (SEO) value.
Finally, you should carefully consider your title and hook. These will be the first words readers see when they land on your page, so it’s essential to grab their attention immediately. You can do this by telling a story or joke, providing fascinating facts or statistics, or posing an intriguing problem the reader can appreciate.
Your blog post title should be both attention-grabbing and concise, yet intriguing enough for readers to want to read further. Begin by outlining your topic briefly, explaining why it matters for the audience you’re writing for.
An outline for your first blog post can help structure your ideas and ensure you include all pertinent information to write a successful piece. Not only does this save time, but it also allows you to get your post done more rapidly.
An outline for your blog post can help you stay organized and create better content, which is essential if you want to establish yourself as an expert writer. With these high-quality articles that attract readers and generate leads for your business, having an outline in place is much less of a hassle than writing them from scratch.
Write the Post
Writing your first blog post can seem intimidatingly overwhelming, but with some careful consideration you’ll create an impactful piece of content that will get noticed and foster trust with readers. You don’t have to finish it all at once – take breaks as needed and work on it gradually over time.
To be successful with blogging, select a topic you are passionate and knowledgeable about. Doing this will enable you to research the subject thoroughly and provide accurate, compelling information in your blog post.
To ensure your content is as relevant as possible to searchers, conduct keyword research before beginning writing. This can be done through free tools like Answer the Public or Ubersuggest, as well as more sophisticated software like SEMrush and Ahrefs.
Once you have your topic selected, create an outline for the post. This will help organize your thoughts, guarantee you cover all important points, and make writing your blog post much simpler.
Next, create several titles for your post. A great headline should clearly state what the post is about while leaving readers wanting more – a great headline will be confusing yet captivating!
Finally, your blog post should include keywords that will boost its chances of ranking well on search engine result pages (SERPs). However, don’t stuff them in or try to fit them into an unnatural place in the title.
Like an effective article, your blog post should be scannable so readers on mobile devices or computers can quickly scan it and access the information they need. Doing this will encourage them to keep reading further down the line.
Finally, an effective blog post should include both an engaging opening paragraph that encourages readers to keep reading, and then a concluding paragraph that brings everything together and leaves them feeling uplifted and motivated.
Step 4: Adding Images To Your Blog

Images are an excellent way to add visual interest and appeal to your blog posts. Not only that, but images help break up the text and keep readers engaged for longer periods of time.
However, there are a few things you should take into account when adding images to your blog. Following these tips will guarantee that your images are optimized and can help drive more visitors to your website.
File Size
Image size is one of the key elements that determines site loading speed. Large images, especially those without descriptions or alt tags, can significantly slow down a page’s load time and result in a poorer user experience.
As a general guideline, images should be optimized for the width and height of their intended display area on a web page. If you use an enormous image in a region measuring 640 x 360 pixels, for instance, your visitor’s web browser must download that huge file then down-sample it to fit – something which takes time even with fast Internet connectivity.
To maximize page loading speed, resize all images before uploading them to WordPress (or whatever blogging framework you use). There are plenty of tools that will automatically resize your photographs to their optimal dimensions before publishing them on your site.
Another way to reduce image size is by compressing them with an image compressor. These programs take similar pixels that make up an image and group them together for a smaller file without sacrificing quality.
Maintaining image files below 1MB helps speed up page loading time and decrease bounce rates, as well as enhance SEO for your website.
Once your file sizes have been optimized, it’s time to consider which image size best suits each situation on your blog. For instance, blog images in landscape format should generally be 1200 pixels by 900 pixels.
When using a featured blog post image in portrait format, make sure it’s sized to a 3:2 aspect ratio or 1200px by 630px.
It is essential to select the correct image file type for each situation. JPEG typically makes for the ideal option on websites since it can be compressed without compromising quality.
WPSmush plugin can reduce image file sizes by up to 20%, but for optimal optimization for your website’s needs you should run them through Tiny PNG before uploading them.
Image Format
Images on your blog can be an effective tool for engaging and retaining readers. Not only that, but adding visuals also helps boost your ranking in search engines and makes posts more visually appealing to new viewers. But be mindful when selecting which images you use in articles – both how you add them and which ones fit best within the layout.
First and foremost, you should be aware of how image format affects website loading speed. If your images aren’t compressed correctly, they could take a long time to load on your website. Furthermore, images that aren’t sized appropriately for your site can cause it to slow down significantly as well.
To prevent this, ensure your images are sized according to the column or content area they will appear in. Doing this ensures they won’t take up too much room on your blog post and won’t consume too much bandwidth on your server.
If you’re uncertain how to go about doing this, there are plenty of online resources that will give you all the advice and instructions necessary. For instance, many tools exist online that will enable you to resize images before uploading them onto your blog.
You could also try Design Pickle for a flat monthly fee that will assist in creating images optimized for search engine optimization (SEO). Even if you’re not a photographer, there are plenty of stock images that you can use to enhance your blog.
When selecting an image for your blog topic, take into account its suitability. For instance, if cooking is the focus, using photos of delicious meals might be suitable. Conversely, if discussing a product, taking pictures of its features and benefits can be useful in explaining how it functions and appears.
Finally, don’t forget to include text on your images – this can help improve search engine optimization (SEO). To do this, fill in the alt text tag with information about the picture such as its title and keyword that you wish to rank for. Search engines will automatically include this data in their results when users search for that phrase.
Image Alignment
Images are a fantastic tool for driving traffic, engagement and conversions – but adding them to your blog can be challenging. This article will give you some helpful advice to get started and ensure your images are optimized for speed and quality!
When adding images to your blog, image alignment should always be taken into consideration. How your images appear can significantly slow down loading time on your site.
For example, if you’re using an image to draw attention to a certain section of text, align it left or right so readers can follow along with the words. Unfortunately, left-aligned images may distract readers while they attempt to read your content.
To guarantee your images are aligned correctly, use the img> align attribute. This tells the browser to center or left-align your image on the page – perfect for creating a unified aesthetic across all of your blog posts.
Another factor when aligning images for blogging is the file type you select. JPEG and PNG files tend to have a reliable size, but if you want to save on site loading speed, GIF files might be preferable instead.
Image alignment is essential for improving search engine optimization (SEO). Many people don’t realize that search engines crawl all text on your blog, including the alt text. Therefore, make sure your target keyword appears in this text so search engines can understand what your image is about and rank it appropriately.
In addition to aligning your images correctly, it’s wise to consider which types of images are trending on social media. This will enable you to identify which types of visuals resonate with your audience and provide inspiration when selecting an image for a blog post.
Image Size
Image size is an important factor to take into account when adding graphics to your blog. Not only does it speed up loading time on the website, but it can also influence how well you rank in Google search results for related keywords.
When using an image larger than what fits in its intended space, your browser may have to reduce its size – and thus take longer to load. To minimize wait times for loading images, try your best to keep their size within reason! Thankfully, controlling image sizes today is much simpler than in years past!
As a general guideline, each image should be roughly the width of the region it’s intended to occupy. This range typically ranges from 500 to 800 pixels depending on your theme and how large is the blog content area it will occupy.
It’s also wise to remember that browsers must download larger files in order to compress them for your visitors, which could slow down your website’s loading speed and result in fewer clicks and reduced traffic overall.
One way to guarantee your website loads as quickly as possible is using Google PageSpeed Insights. This will tell you which parts of your site take too long to load and provide suggestions on how to speed them up.
Optimizing your website’s performance is the most crucial element for improving its speed. You can do this manually, but for optimal results, use a plugin that does it for you automatically.
Not only does this make your website load faster, it also improves the quality of your images. Reduceing their file size ensures they’re both visually appealing and search engine optimized (SEO-friendly).
When uploading personal photos or using stock imagery, it’s essential to select the appropriate size for each image. Doing this will guarantee they fit correctly within your blog content and help prevent having to crop them later on.
When selecting an image for your blog, there are a few things to consider such as what message it conveys and whether it fits with your brand’s aesthetic. Furthermore, make sure the image is pertinent and doesn’t steer readers away from reading your work in an inappropriate direction.
Step 5: Creating Links

Creating Internal and External Links For a Blog
Generating internal and external links for your blog is a critical strategy for increasing traffic and optimizing SEO. But this process can be tricky, so you should take great care in considering all factors involved.
Linking to high-quality external resources on reliable sites is an effective way to build authority and offer more resources for your readers. It also helps establish your brand as a reliable resource.
Contextual Links
Contextual links are an integral factor when creating a blog. They can boost your search engine visibility, boost credibility, and encourage readers to trust what you have written. Furthermore, contextual links help develop quality leads for your business – those individuals most likely to buy from you.
Contextual links are essential for building contextual authority with Google and showing search engines your site is associated with high-quality resources. Utilize authoritative sources that can assist your readers by linking back to their websites within your articles. Doing this will increase your credibility with the search engine and let searchers know your site has quality connections.
Create links by reaching out to industry experts and asking them to write about your business or brand on their blogs. Similarly, reach out to bloggers within your niche and request that they share your content or interview you for a blog post.
These external and internal links, also referred to as contextual or in-content links, are particularly beneficial to search engines since they let them know which articles are most pertinent to a given query. When creating these links, make sure you use relevant keywords and long-tail phrases your target audience uses when seeking information online.
Another advantage of contextual links is that they’re less distracting for readers and typically more memorable than a link in an ad or banner. This means they’re more likely to read your content and engage with it.
If you’re new to search engine optimization (SEO), it can be easy to overlook these links. But they are essential for successful rankings so it’s essential that you comprehend their differences from other types of links.
Contextual links come in three varieties: internal, external, and reciprocal. Depending on their nature, each type of link can have either a negative or positive effect on your rankings.
Internal and external links are the two primary forms of contextual linking, and they can be extremely beneficial to your business in several ways. Not only do they increase website visibility, but they can also drive more traffic and sales to your store, helping establish you as an authority within the industry.
Navigational Links
Blog navigational links help site visitors quickly locate the pages they desire to read, while increasing time spent on each page (which helps reduce bounce rates).
One of the most essential components of an effective internal linking strategy is ensuring all pages you link to are relevant and captivating for your reader. This includes using keyword-rich anchor text for each link, which helps search engines recognize the importance of each linked page’s content and context.
Establishing an effective navigational strategy can also increase your site’s ranking on Google, since bots follow navigation links as they crawl a website. Doing so could boost the content of pages and blog posts higher up on SERPs if you adhere to best practices for SEO.
To make your navigation intuitive and appealing across devices, utilize different styles for mobile and desktop sites as well as using “breadcrumbs” to guide visitors through your site’s information architecture.
Another way to enhance navigation is using “next page” links, which take readers to the next relevant page in a series of related articles. This not only helps readers learn more about your blog but also generates additional traffic for you.
Additionally, having a “next page” link on your blog posts can improve your site’s search engine visibility by increasing the likelihood that Google will crawl them.
Although it may not always be possible to include a link within every paragraph on your blog, you can attempt to limit the number of links in each article’s body to an amount that makes sense. Too many links can baffling search engines and make indexing pages harder for them.
Furthermore, search engines may penalize websites with too many links in their footers. As a general guideline, search engine guidelines suggest having no more than 10 to 20 links on a site-wide footer.
However, if your site contains a lot of pages and you need more than 10 links per page, consider including contextual links within your post content. These are links that appear naturally within an article’s body text and take readers to other web pages with valuable content.
Footer Links
Link building for your blog is one of the most effective methods to increase its ranking on search engines. But be mindful when using link-building techniques.
Links that are unnecessary or spammy can harm your brand’s reputation and create an uncomfortable experience for readers. Use appropriate anchor text that pertains to the page you are linking to, and ensure it’s relevant.
When writing a post about an important event in your industry, adding a link to another blog article that covers the same subject might make sense. This type of link is known as a contextual link and it can help boost your blog’s ranking on search engine result pages (SERPs).
Another way to create internal links for your website is by adding menu links in your footer. You can do this using either a WordPress widget or with a plugin like Header Footer Code Manager.
This plugin enables you to add code to any part of your footer, automatically updating it when changes are made to the page. Furthermore, you can use it for creating new content for your footer as well as including various types of links in it.
Footer links are an effective way to enhance user experience on your website and can add a unique and captivating element. They may feature things like map buttons, contact information or copyright notices for added flair and purpose.
Include social media icons in your footer as an easy and efficient way to encourage website visitors to connect with you. You can choose to place these icons at the bottom of your footer, or on individual pages within it.
To give your footer a polished and professional appearance, you can add a logo or business name. Furthermore, include a copyright notice as well as contact forms or calls-to-action for added engagement.
Constructing internal and external links for your blog can be a tedious task, but the effort pays off! Not only will this improve SEO, but it also makes the site simpler to navigate for visitors and more engaging for your brand.
Image Links
Establishing internal and external links for a blog is essential to its success. These links have several advantages, such as decreasing bounce rates, increasing authority, and improving search engine rankings. Furthermore, these are effective in targeting specific keywords or phrases.
Internal links on a blog come in four varieties: contextual links, navigational links, footer links and image links. Each can lead to different pages on your site or other domains.
Internal links are the most popular type, consisting of a text-based hyperlink embedded within the body text of a page. These can be used to direct readers towards content relevant to a post’s topic, such as an article on related subjects or captivating videos.
An internal link can also be a navigational link, leading to various sections of a website or other domain. This type of link serves as an expedient shortcut for site visitors so they can navigate pages quickly and efficiently.
As with all link strategies, it’s essential to keep these links pertinent and pertinent to the blog’s topic. Incorporating links that point towards topics or products related to your main focus can help increase its relevancy and ranking power.
Linking to sites within your niche can also help boost Google and other search engines’ awareness of your content, potentially leading to a higher SERP ranking.
Additionally, providing attribution for images shared on your site can be a wise practice to ensure others credit you when they use your photos or infographics and avoid accusations of copyright infringement.
Though this strategy can be successful, it is also essential to monitor the use of your images on other websites. Unfortunately, people often use your photos without providing you with attribution; this could have a detrimental effect on both your brand and search engine rankings.
What is an internal link?
Internal links are a type of SEO strategy designed to help users and search engines navigate your website content. They’re also known as backlinks, which help search engines understand your site structure better and give your pages better rankings.
How to Create an Internal Link
When creating a page, it is necessary to include an hyperlink pointing at another page. You can do this using either text box or graphic tool; doing so makes your website more accessible for all visitors.
Link Whisper is a plugin designed to automatically generate internal links on your WordPress website. It works with any post or page that includes text boxes or graphics, and in addition to creating links, it also displays an overview of all existing links.
Link Whisper is a free plugin available from the WordPress plugin directory and allows users to create various types of internal links such as contextual, navigational, footer and image links.
What is the Importance of an Internal Link?
Internal links are hyperlinks that connect pages on your site to another. They can be an effective strategy for optimizing SEO on your website.
Search engines use internal linking to comprehend the context of your pages and construct a site hierarchy. It also assists them in spreading link juice to the most significant pages on your website.
SEO
Internal links are an integral component of SEO and help your website rank well on search engine results. They may also enhance user experience and engagement on your site.
Google crawls the web millions of times daily, analyzing every link that points to your site. This process gives them insight into what content you have, where it comes from and its relevance.
That is why many SEO practitioners focus on building backlinks. But what many don’t realize is that internal links can have just as much of an effect on your site’s rankings.
Internal links are essential for SEO as they demonstrate the connection between two pages, signaling Google that page A is connected to page B – this information helps determine ranking positions.
Internal links are crucial for SEO purposes as they help establish an information hierarchy on your website. This helps search bots comprehend its structure and which categories it belongs to.
Hierarchical internal linking is an integral element of an SEO-friendly website architecture and can help your rankings rise in search results by signaling to Google that certain pages are more significant than others.
Your internal link strategy can be further strengthened by creating a navigation system that groups pages and sections together, like departments in an organization. Doing this is particularly useful if you want to demonstrate your site’s extensive coverage on a topic.
When creating your navigation, be sure to include some relevant internal links on each page, such as articles or blog posts that pertain to the one being linked to. It is also wise to link important pages in your navigation whenever possible so Google knows you care about certain topics.
An effective internal linking strategy is the best way to make your website easier for both visitors and search engines alike to navigate. It can make all the difference between a frustrating site for potential customers, and one which encourages them to stay and learn more about your business.
Usability
An internal link is a hyperlink that points to another page on a website. These links are essential for search engine optimization and user experience, helping people navigate around the site more efficiently and staying longer on it.
They can also aid in improving the SEO of a page by creating thematic clusters. This allows Google to better comprehend your page’s nature and prioritize it higher in SERPs.
When linking to other pages, it’s essential that the content you link to is pertinent and beneficial for users. To accomplish this goal, create a topical internal linking strategy.
For instance, if your business offers tree stump removal services, having both a service page and blog post that details the cost of hiring an expert would be beneficial. By linking from one page to the other, users will gain valuable information while increasing both pages’ SEO rankings.
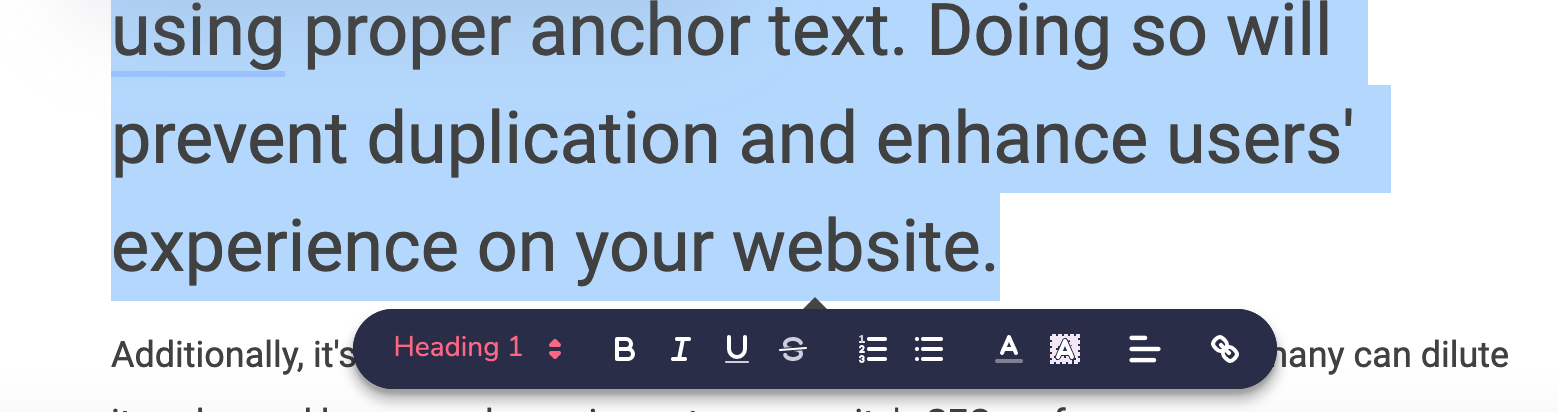
You can accomplish this by including a link to the relevant content on another page and using proper anchor text. Doing so will prevent duplication and enhance users’ experience on your website.
Additionally, it’s wise to limit the number of internal links on a page. Too many can dilute its value and have an adverse impact on your site’s SEO performance.
Although there is no set number of internal links a page should contain, some experts recommend having one per article and three to five per piece of content. Furthermore, having several navigation links that point to your next most important webpage on your website can be beneficial.
Your navigation menu and footer of each page on your site should provide users with a quick link to the next most important pages after they arrive on your site. Ideally, these should remain consistent across all pages visited.
Conversions
One of the most overlooked elements of SEO is internal links. These connections take users to pages within a domain, providing them with additional content and extending their session on the site.
Anchor text and related content pass PageRank (or SEO value) to Google, who uses them to understand the most important pages on a website, leading to improved rankings and search results.
Internal link strategies that work are those that direct users from traffic pages to conversion pages optimized for specific call-to-actions. By taking this approach, businesses can direct readers from blog posts that attract a significant amount of traffic towards high-converting landing pages and increase their lead generation efforts.
For example, a Brafton client in the news industry began adding internal links from articles to a deep site page that was essential for lead generation. Within just 10 months after implementing this strategy, visits to that page had more than tripled.
Link exchange is also an effective way to spread your link equity among other highly relevant pages on your site, helping boost their ranking and traffic. For instance, adding a link from one of your most beneficial blog articles to another page that covers triathlon training fundamentals is an excellent idea.
When creating anchor text for links to pages, make sure the phrases used are natural and contextually relevant. Avoid using exact match keywords which could appear spammy to search engines.
You can also use shorter phrases like “Cable installation safety tips are always essential.” This strategy sends a strong signal to search engines that your target keyword is pertinent to that page.
Finally, when creating an internal link strategy it’s essential to take into account both user experience and SEO considerations. Your practices should feel intuitive and purposeful – improving visitors’ experiences while increasing their engagement with content on your site.
Furthermore, when creating an internal linking strategy that involves redirecting users from traffic pages to conversion pages, be sure to include compelling calls-to-action on each conversion page. The right CTAs can make all the difference in conversion rate between a bounce and conversion.
Time on Site
Google Analytics uses the average time on site metric to track how long people spend on your website. This metric can give you insight into which content users are most engaged with and whether or not your CTAs and conversion actions are optimized correctly.
Internal links are an essential SEO fundamental, passing PageRank and context through anchor text and surrounding content. Furthermore, internal links improve user experience by helping visitors more quickly locate information on your site.
Though not an SEO ranking factor, social proof can help increase your search traffic by signaling Google that your content is valuable and pertinent. Furthermore, it helps build trust with users by demonstrating they will find what they need on your website.
However, there are a few things to keep in mind when analyzing this metric. Most importantly, remember that this metric relies on the timestamp of the first page in a session – not exit pages or bounces. Therefore, if someone spends several minutes reviewing your product but then leaves without completing their purchase, their session won’t count as an actual visit.
When assessing your average session length, it’s essential to take into account the context of your website and what each page is intended for. For instance, if your home page serves as an introduction to a concept and serves as a bridge to other pages, then you might expect low average session times.
If your product pages provide more in-depth details about a product, then you can anticipate longer average session durations. With this data in hand, you can decide how best to communicate with your users.
Though internal links aren’t an SEO ranking factor, they can help increase your search traffic by showing Google (and other search engines) that your content is valuable and pertinent. It’s essential to remember that this metric primarily relies on the timestamp of the front page in a session, not exit pages. Therefore, if a visitor has multiple sessions on your site, their session duration may differ between pages.
External Links and Their Importance
External links are an invaluable content building tool, but they’re also essential for improving your website’s search engine optimization (SEO). Here are a few things you should be aware of regarding them:
An external link is a hyperlink that points to another domain than its original origin. This type of outbound external link is commonly referred to as an “external backlink.”
SEOs agree that external links are the most influential source of ranking power. This is because external links pass link equity differently than internal links, and search engines take them as votes of confidence.
According to inbound marketing specialists, external links have a greater effect on search engine rankings than internal links.
How to Utilize External Links Correctly
When crafting a blog post, it is essential to include at least some external links to trustworthy websites. Doing this will enable your readers to quickly locate additional information and give your page an advantage in search engine results.
However, external links should be limited to a certain number and opened in a new tab to ensure readers don’t leave your site entirely. Furthermore, make sure the links you link to are pertinent to your blog article.
Generally, the more popular or authoritative the linked pages are, the greater its influence on your search engine rankings. For instance, having an external link from The New York Times on your website could have a major effect on its visibility in search engine results.
It’s essential to use distinct anchor texts for all external links. Reusing the same keywords across all of your external links sends an incorrect signal to search engines, potentially impacting their rankings.
When selecting how many external links to include in your content, take into account your audience’s needs. Readers are more likely to click on a link that leads them to another page with similar material than one that takes them somewhere completely unrelated and irrelevant.
Furthermore, it’s ideal to include an appropriate ratio of internal and external links on each page on your website. Doing so will enable your content to reap maximum SEO rewards without jeopardizing its overall ranking.
A strong external linking strategy is an integral element of any successful SEO campaign and should be utilized by all marketers with an online presence.
The most successful external linking strategy involves obtaining high quality links from various sources, primarily other relevant industry websites.
High-quality external links can be obtained through SEO and link building activities, such as submitting your website to directories and blogs. You could also ask other online influencers to include your link in their articles or social media posts, or use an external link generator such as Backlinko for this purpose.
How To Start A Blog Step 6: Proofread

To make your blog post appear polished and professional, proofreading it is a must. Not only does this improve searchability on Google and other search engines, but it also shows that you value your readers and their time.
Proofreading your blog post doesn’t have to be a tedious task; with just a few strategies in hand, you can guarantee that your articles are free from embarrassing grammar and spelling errors.
Utilize an External Editor
There are a variety of editing services online that can assist in making your blog post a high-quality piece of content. These services even scan it for errors that search engines typically detect, such as typos or missing words.
Utilizing these tools is essential, as they can save you time and money by helping you detect mistakes that you wouldn’t have caught on your own. Once you find a service that meets your needs, working with them regularly is recommended to guarantee your blog content always reflects the highest standard.
Have a friend or coworker read your blog post before publishing it
A fresh set of eyes can be invaluable when proofreading your post, as they may not be as familiar with the topic and can spot any inconsistencies or areas that need further explanation.
Maintain a Short and Concise Writing Style
With today’s short attention spans, it is now easier than ever for readers to switch over to another writer’s content that may be more pertinent than yours. Therefore, you must provide valuable information quickly and efficiently in order to keep readers engaged.
One of the best ways to accomplish this is by keeping blog posts concise. Doing so involves breaking up your text into H2s, or headings, that make it simpler for readers to locate what they need quickly.
Create a Clear Purpose for Your Blog Posts
Before you begin crafting content, ensure that you have an objective in mind. This will guide your topics and writing schedule, as well as allow you to decide what topics best suit your audience.
Create a Working Title
Before beginning to write your blog post, it’s essential to come up with an organized and precise title. This will give the post direction and prevent writing about topics that are too general or overwhelming.
Additionally, this will prevent you from writing something too technical for your audience or something too personal to them.
Finally, be certain of your purpose for writing the blog post and how it will benefit your audience. This will enable you to make decisions regarding content such as whether to include a video or infographic.
A great tip when proofreading your blog post is to do it early in the day. This ensures you’ll be awake and alert while reading the content, leading to fewer mistakes.
Step 7: Post Your Article

Writing blog posts requires more effort than many people realize. That means you cannot simply publish your post and be done with it; there are several steps you should take before and after publishing to maximize the benefits of all your hard work.
1. Respond to Questions and Respond to Comments on your Blog Post.
It’s not unusual for people to leave comments on your blog, which can be an excellent way of connecting with readers. By replying to those who left the comment, it demonstrates your desire to connect with them both directly and through your post.
2. Encourage readers to spread the word about your post.
Asking readers to spread the word about your content is a great way to increase traffic from existing followers and generate additional income. By encouraging them to spread the news about it, you make it as effortless as possible for them.
3. Offer an incentive for signing up for your newsletter or email list.
Giving readers a reason to join can be a personal touch and remind them that you have valuable content available for them to read. This could include offering something as simple as a PDF of a recipe card, cheat sheet or summary of key takeaways from your blog post as an incentive.
4. Conclusions are an ideal time to express your appreciation for readers’ contributions and motivate them to keep reading on your site or blog.
Conclusions can range in complexity and include personal stories or anecdotes, quotes from satisfied customers or industry experts, or simply a reminder of the significance of what was discussed in the article. However in product review blogs or other blogs you may update they aren’t necessary.
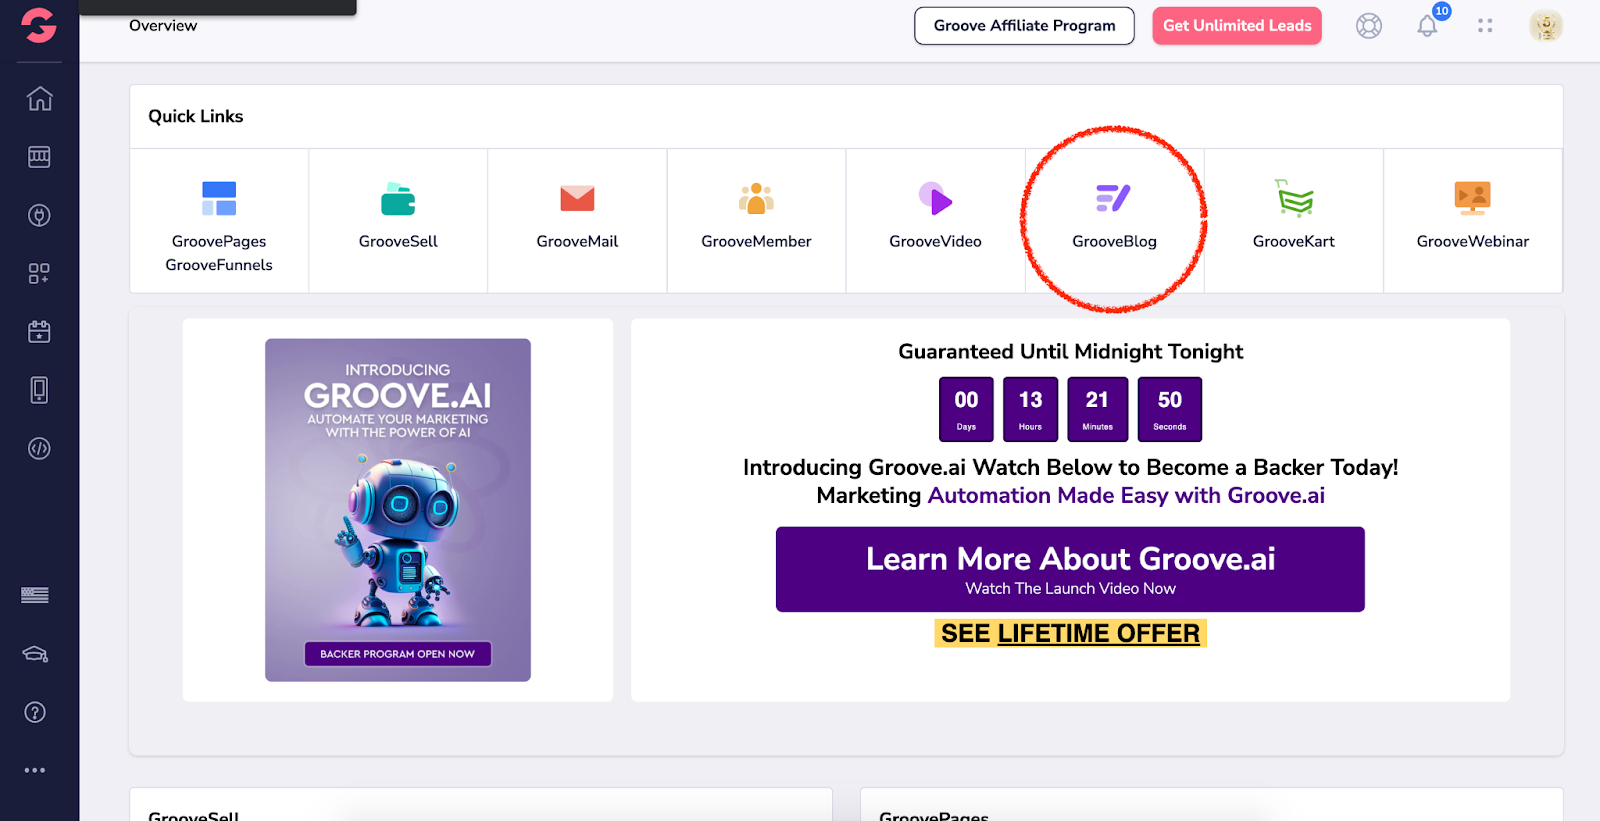
*Bonus* Grooveblog Tutorial
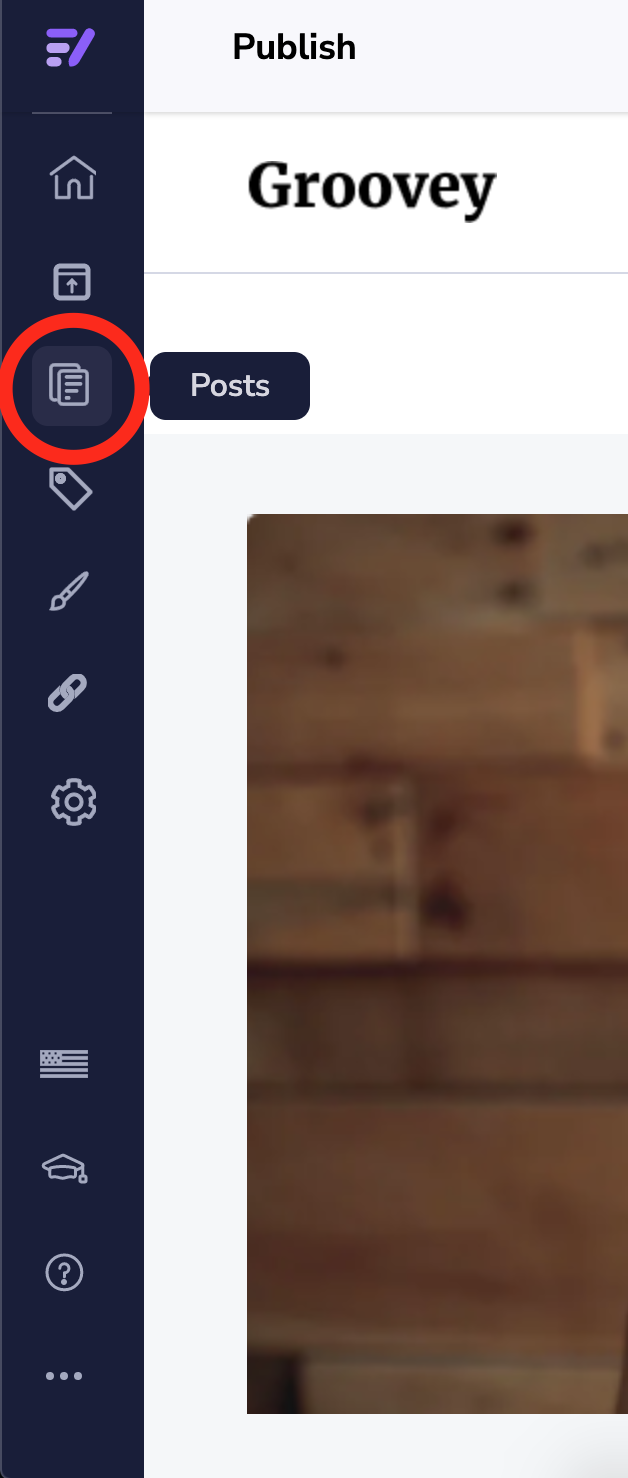
After Signing Up For Grooveblog you will see the dashboard on the right side of the dashboard there is a groove blog button and that is what you will use to access your blog(s) from now on.
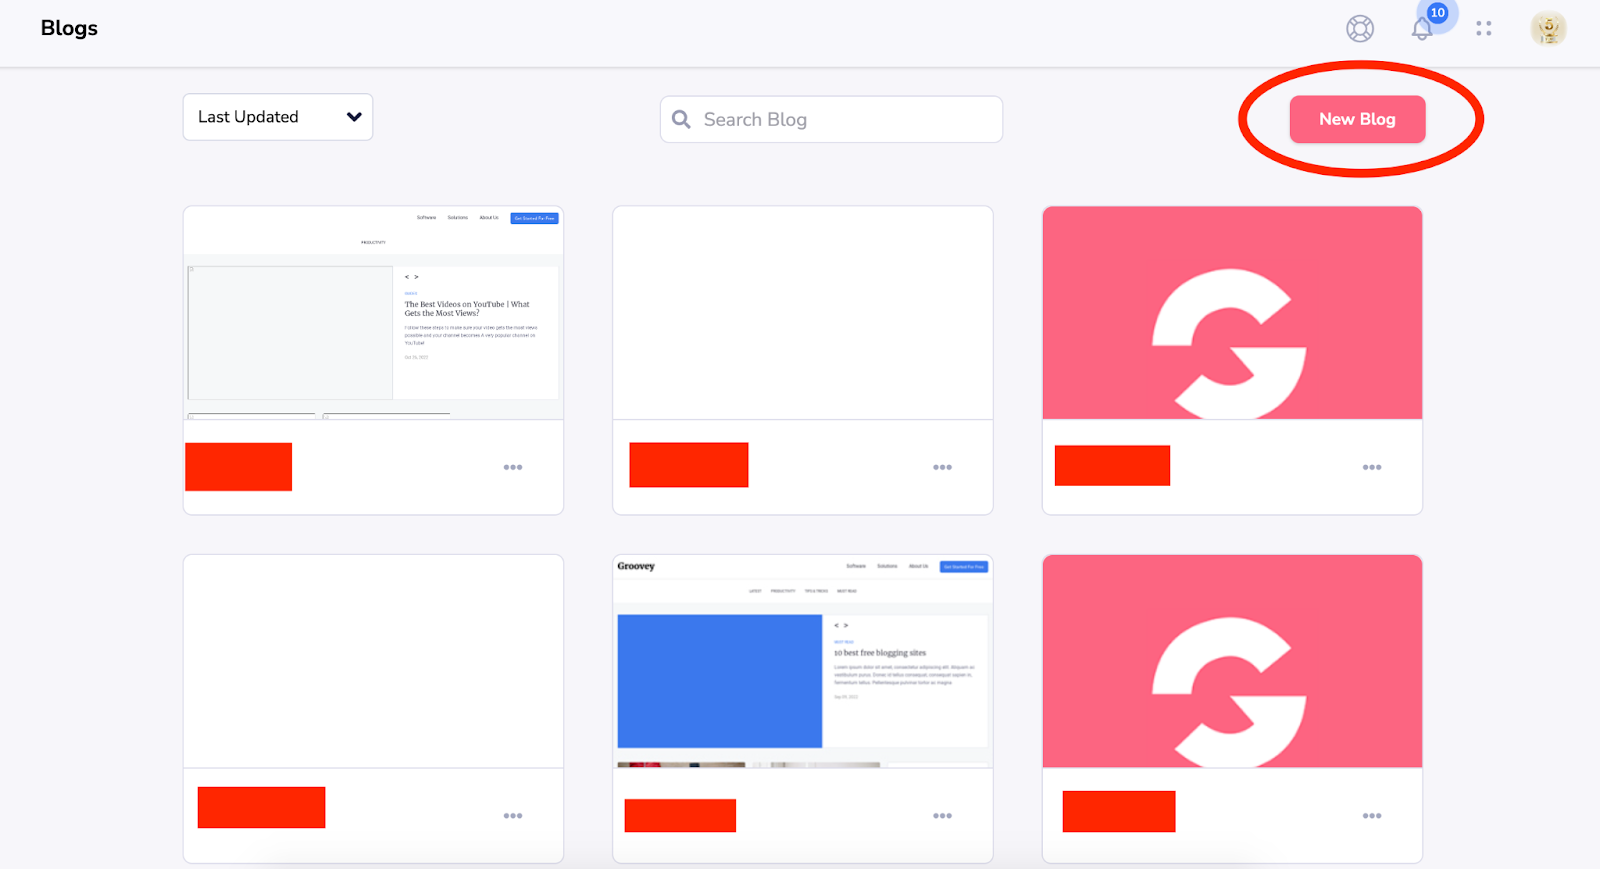
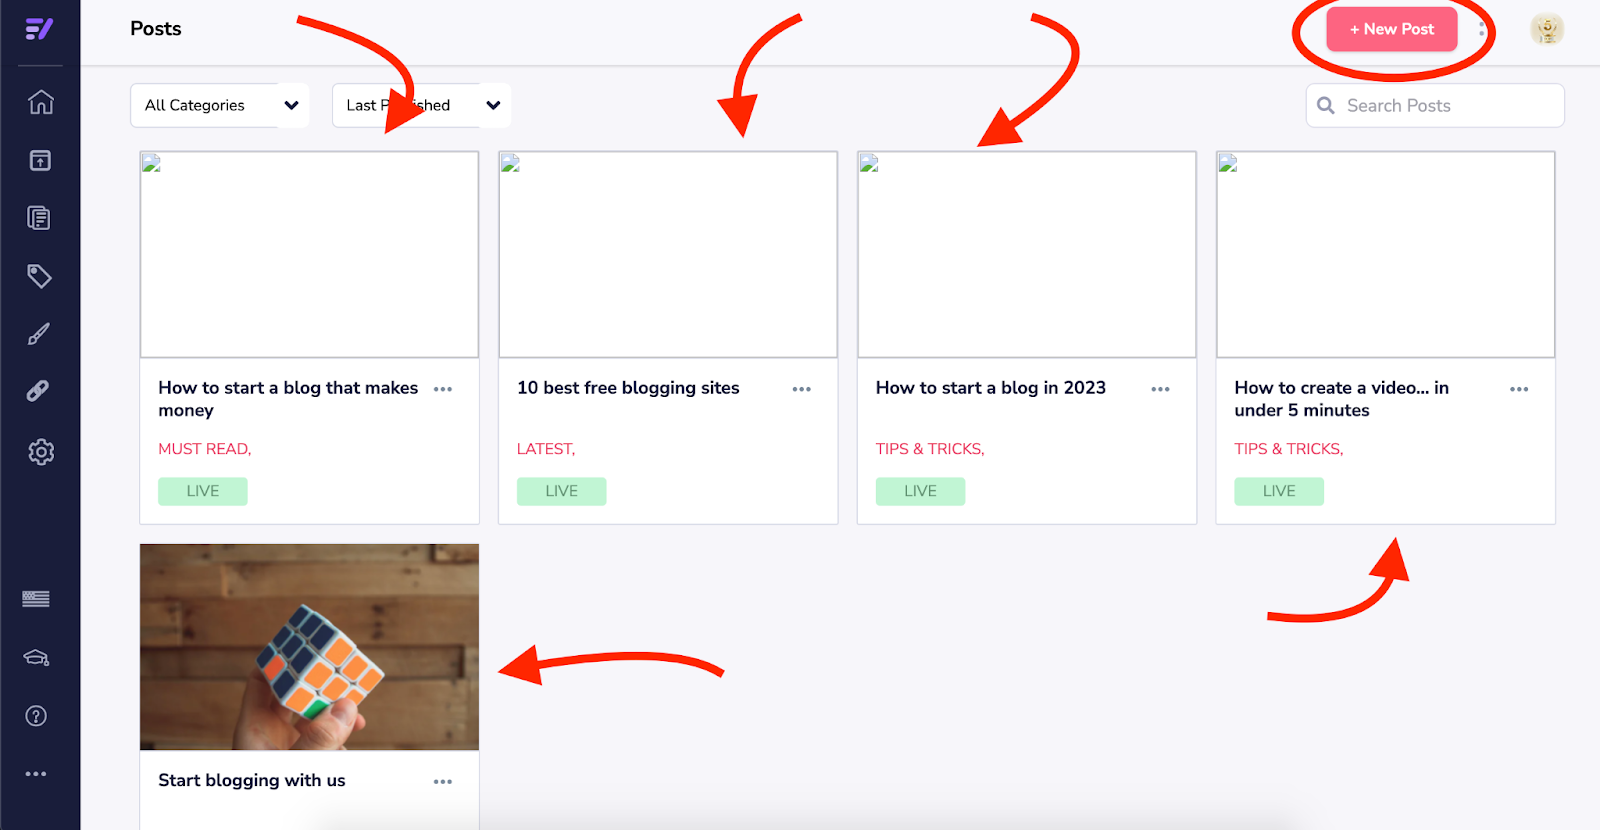
When you navigate to grooveblog you can choose to make a new blog post or you can choose from an existing blog (only if you have made a blog before)
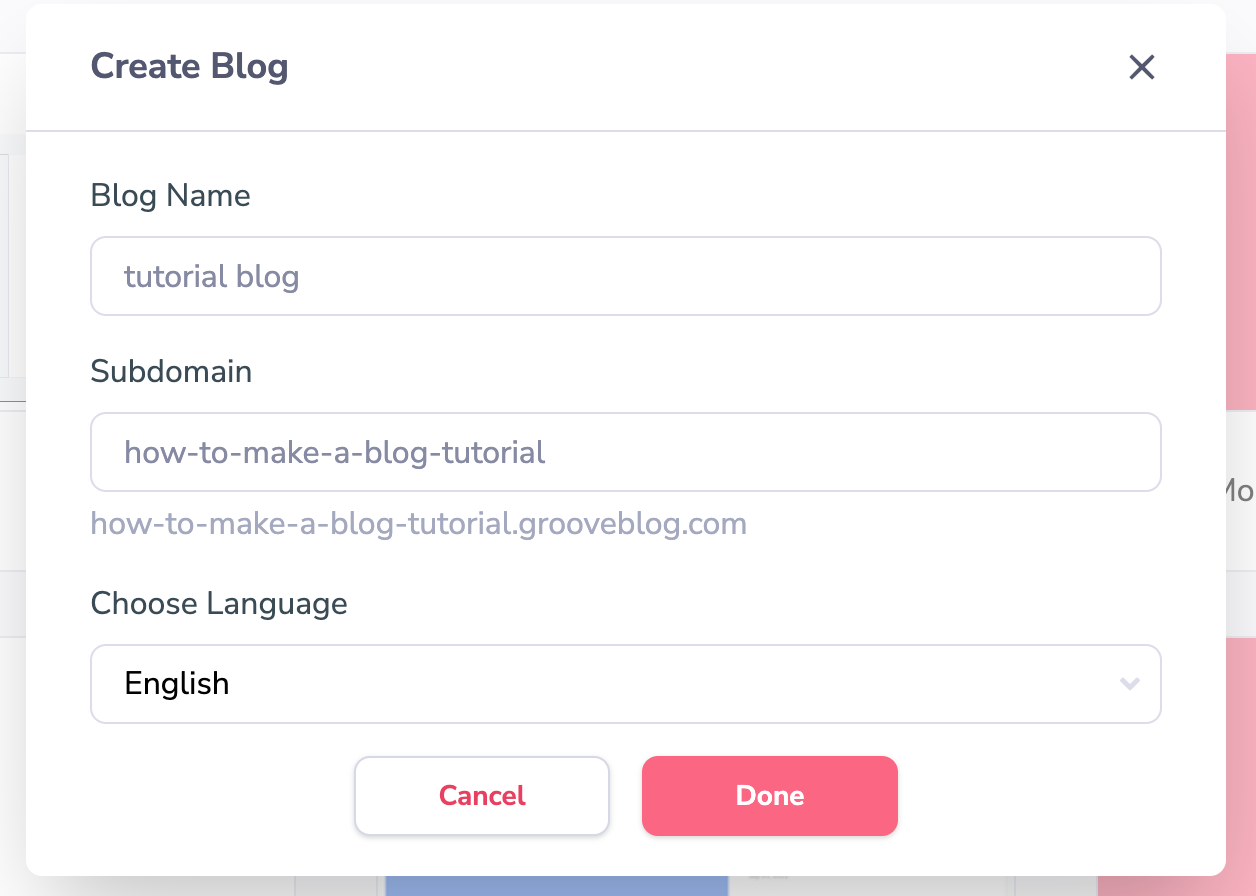
Next you will fill in the required information and hit done…
Now you have created(or logged into and existing) blog and it’s time to customize to your liking. To customize, navigate to the menu on the left side of the screen and click on posts.
Now you can create or edit a post just click on new post or an existing post and and your good to go!
After you access your blog it will be a blank slate ready to edit

To edit just start typing! You can add text titles images keywords and more! On the sidebar on the right side of the screen you see all the information you need to edit.
Now, as you will be writing your articles with an ai writing tool all you need to know is that if you select a body of text or double-click you can change the text format (H1, H2, H3, H4, H5, H6, and Normal Text, make text bold, underlined, or italic, add bullet points, number text, change tex color, highlight text, add links to text, and change the format.
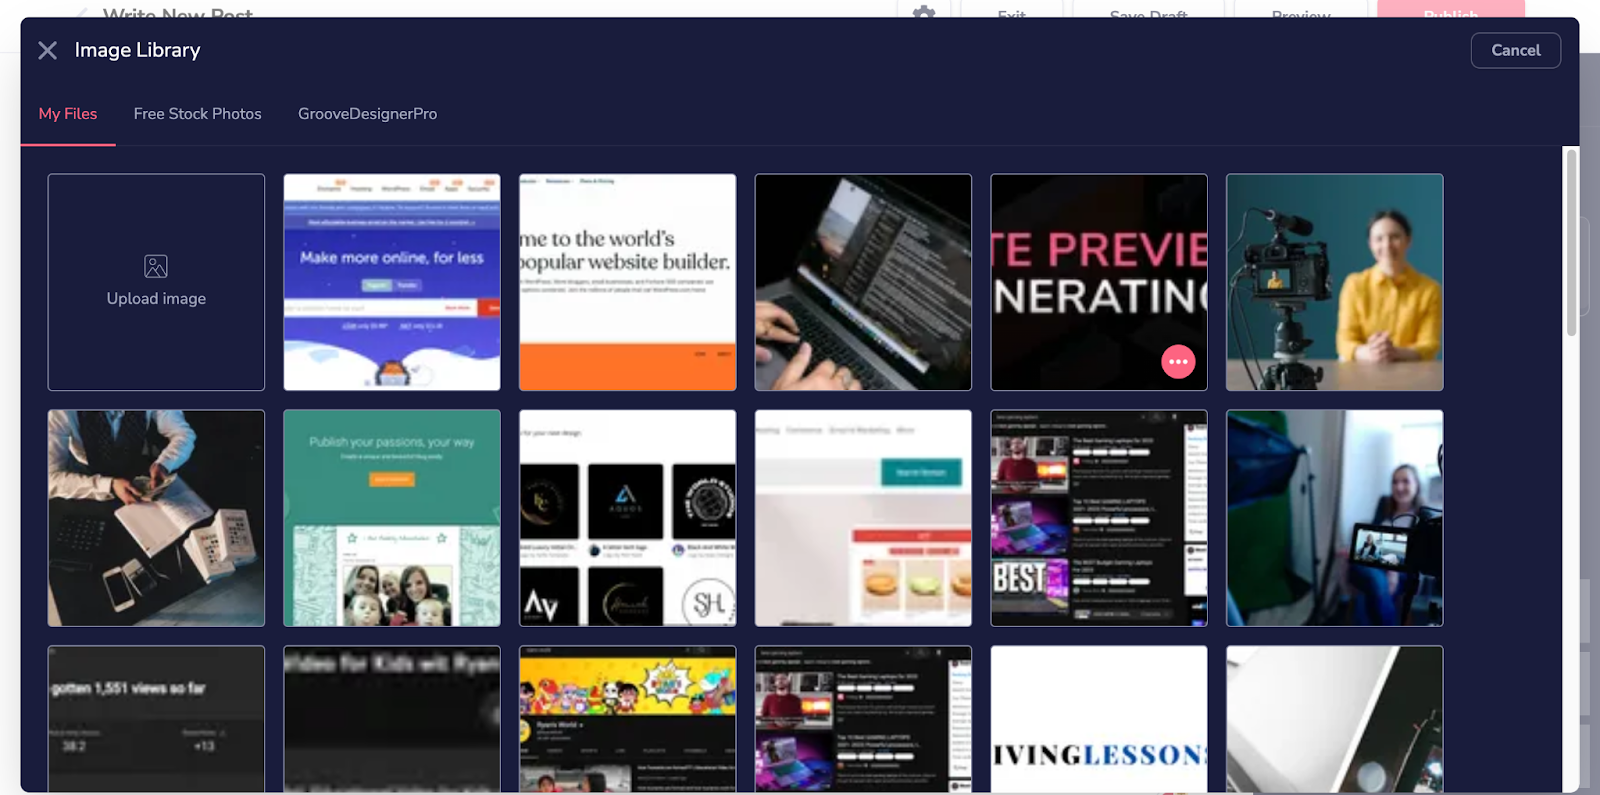
You can add images by hitting the plus icon that shows up when you press enter and then you can add your own or get images from their growing stock library.
After adding your images you can then preview and publish your article! And now you’re all set just rinse and repeat for all of your articles.